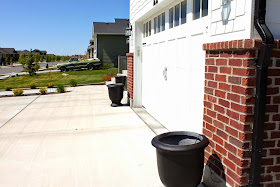
Now that I have pots I needed a way to figure out how to get them watered - automatically- I'm not about to water by hand! I tried it last year with my window box and it was a bit of a pain whenever we left out of town. Initially I thought I might have to hire someone to do this for me - since I have no experience with this sort of thing (and my husband works too much to have time for this sort of thing) but after talking to the sprinkler guy at home depot I knew I could do it myself. Less than $25 and a few hours later I now have water automatically running to my pots!!!
I'm so proud and happy - I just had to share!
At the side of my house is my garden (all ready for plants soon :)
When it was installed, I had my landscapers run water to my pots. So I knew it was possible, but I also knew it involved a little black tube to run to wherever the pots are. The tubing was easy to hide under the rocks in my garden but I didn't really want black tubing running along the front of my white house from pot to pot to pot! Then it hit me - I could run it along the INSIDE of the garage door where it would be hidden. I was so excited I immediately headed to Home Depot and got the parts.
First Step: choose the closest sprinkler to run your tubing from, screw off the sprinkler head, attach the drip system head attachment, then screw your sprinkler head back on.
Next attach 1/4" tubing (it comes in 50 or 100ft lengths) to the drip system head attachment and run it to your pot.
My closest sprinkler was a sprayer in my garden box so that's where the tubing began
I ran my tubing under the dirt in my garden box, out the side of the garden box, down under the rocks, over to the house, then wedged it under the flashing at the base of my bricks.
I was able to wedge it under the flashing all the way down the side of the garage - woo hoo, totally hidden! Finally I made it to my pot! Because I wasn't stopping here, I had to cut the line, put in a 1/4 in. Barbed Tee

then continue the line into the garage to the next pot.
You will also attach tubing to the other end of the "T" to run into your pot.
To the end of the tube inside your pot attach one of these adjustable micro sprayers, they come in a pack of 3.
once you attach the sprayer to your tubing the spike sticks in the soil and waters your plant like so.......
To continue the line into the garage just make sure you secure it at the very base, so the garage door still closes. Check to see if your garage door closes ok - if it smashes the tubing you will need to notch out the inside bottom corner piece of the baseboard and run the tubing under that so it's "protected" from the garage door. One of my garage doors closed without smashing the tube, the other garage door smashed it so I notched out that side using a small hand saw and drill.
Once inside the garage I ran it up, then over, back down the other side, and out the base to the next pot. Just make sure to secure it and keep it out of the way of the garage door hardware! I used a two-pronged nail (looks like a heavy duty staple, the kind electricians use to run wiring along studs before drywalling ) and hammered the tubing in place.
Finally the last pot had water and I was done! At least until I started hooking up my window box to have sprayers now too :)
Now I just got to go get my plants!


No comments:
Post a Comment