Pages

Wednesday, May 28, 2014

Easy Chalkboard Lettering

For Mothers Day this year I was in charge of a meeting at my church for all the Women and Mothers. Because it was a "special occasion" I wanted it to look special.  Since there is already a chalkboard in the room I wanted to do some fancy Chalkboard Lettering on it (since it is all the rage right now!).
Problem was I am not an artist that can free hand, and I don't have an overhead projector.....
After doing some searching on the internet I found out you can create a document with whatever you want on it, print it out, rub the back of it with some chalk, then put the poster up on the chalkboard and trace with a pencil.  When you remove the poster you have an outline that you can then fill in.  
It worked like a charm!
So I thought I would share the document I made ....

It is a quote from a Hymn "As Sisters in Zion."

I created the document using Picmonkey (to get your wording to curve you have to type your word 1 or 2 letters at a time and rotate each of the letters to create the curve).
Then I took the file to Staples and printed it off  (roughly 4ft.x4ft.)
I rubbed the back with chalk but found it was actually not necessary.  Just tracing the letters with a pencil left an outline on the chalkboard that we then filled in with chalk.
I had a couple friends helping me so it went pretty fast and ended up looking great!


Tuesday, May 27, 2014

New York


My Husband and I just celebrated our 14th anniversary in New York this past weekend.
We had a great time and I thought I'd share our tips and tricks!
Do: The free Staten Island Ferry to see the Statue of Liberty - no need to go to Liberty Island, (unless you don't mind paying money for it and standing in long lines).
Do: Bike the Brooklyn Bridge and Central Park
Don't use a "city bike" rent from another company.  The city bikes can only be checked out for 30min intervals and that is not enough time to enjoy yourself!


Do: the Top of the Rock observation deck (some people choose this instead of Empire because it is cheaper and the lines aren't bad- plus it gives a great view of the Empire state building).  We chose to do both and did Empire State at night.  Thanks to a good tip we went at Midnight and avoided all the lines (no need to buy the express pass).

Do: get a 7day Subway pass, it's cheap and get's you everywhere you need to go.
Don't: use a taxi, there's just no need!

Do:  Stay in Manhattan - it's where you will spend all your time anyway!  It can be noisy (even in the quieter areas of town) but we found that keeping our room's fan running all night drowned out the noise perfectly :)  Not energy efficient, I know - sorry!

Our final list of Do's are all about food!
Katz Deli - for the pastrami sandwich 
Vanessa's Dumpling House in Chinatown (we got the 10 dumpling sampler for $5.00, and 4 fried dumplings for $1 and they were incredible!!!)
The Shake Shack in Madison Square Garden (they have a few locations but this one is the most scenic by far).  I loved their SmokeShack burger with chopped cherry pepper and for memorial weekend they were featuring a pecan pie concrete that was divine!
Lil Frankie's Pizza- there are lots of great pizza places to choose from, so it was hard to narrow it down but this is the one we tried (we can't imagine anything being better than this place).  The pizza was exactly like what we had in Italy.  Plus it was open late (not a lot of restaurants were open late surprisingly).
Waffles and Dinges Cart - they have a few trucks around Manhattan.  We had their Belgian waffle with strawberries and whip cream for breakfast two days in a row!  We liked the truck at Grand Army Plaza at the corner of Central Park - after picking up the waffle it was nice to cross the street and eat it in the park!


Wednesday, May 14, 2014

Living Room Re-DONE!!!!


 I added the final finishing touches - 
here they are!

Gold Honeycomb Lamps- I got them at Target on Clearance, $37 for base and $17 for shade

 Black side table- repurposed from my Master Bedroom


 Old Brass Piano Lamp between the chairs -$28 from a random small store in Midway, Ut

Ottoman - DownEast Home $200
Grey and White Geometric Throw on top- $20 from Target
 I keep collecting free old books from the ReStore in Salt Lake for my fireplace shelves.


There is only ONE last piece I am missing........
I want a Fiddle Leaf Fig tree to go in my corner basket!!!
(the basket's from Marshalls on Clearance for $15).
I go to home depot constantly hoping to find a large one, but all I have ever seen are 10" ones and although they are a great price, I think it will take 2 or 3 years to get to be the size I want.  I don't have that much confidence that I will be able to keep it alive for that long!
*UPDATE:  I got my Fiddle Fig!  Click Here to see.

For more info on different aspects of the room click on the links:

and just so you remember here's what it used to look like :)


Monday, May 5, 2014

Hooking up Automatic Sprinklers for Potted Plants

Now that I have pots I needed a way to figure out how to get them watered - automatically- I'm not about to water by hand!  I tried it last year with my window box and it was a bit of a pain whenever we left out of town.  Initially I thought I might have to hire someone to do this for me - since I have no experience with this sort of thing (and my husband works too much to have time for this sort of thing) but after talking to the sprinkler guy at home depot I knew I could do it myself.  Less than $25 and a few hours later I now have water automatically running to my pots!!!
I'm so proud and happy - I just had to share!

At the side of my house is my garden (all ready for plants soon :)  

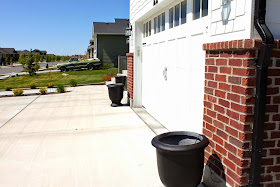
When it was installed, I had my landscapers run water to my pots.  So I knew it was possible, but I also knew it involved a little black tube to run to wherever the pots are.  The tubing was easy to hide under the rocks in my garden but I didn't really want black tubing running along the front of my white house from pot to pot to pot!  Then it hit me - I could run it along the INSIDE of the garage door where it would be hidden.  I was so excited I immediately headed to Home Depot and got the parts.


First Step:  choose the closest sprinkler to run your tubing from, screw off the sprinkler head, attach the drip system head attachment, then screw your sprinkler head back on.  

Next attach 1/4" tubing (it comes in 50 or 100ft lengths) to the drip system head attachment and run it to your pot.  
My closest sprinkler was a sprayer in my garden box so that's where the tubing began
I ran my tubing under the dirt in my garden box, out the side of the garden box, down under the rocks, over to the house, then wedged it under the flashing at the base of my bricks.
I was able to wedge it under the flashing all the way down the side of the garage - woo hoo, totally hidden!  Finally I made it to my pot!  Because I wasn't stopping here, I had to cut the line, put in a 1/4 in. Barbed Tee
then continue the line into the garage to the next pot.  
You will also attach tubing to the other end of the "T" to run into your pot.
To the end of the tube inside your pot attach one of these adjustable micro sprayers, they come in a pack of 3.
once you attach the sprayer to your tubing the spike sticks in the soil and waters your plant like so.......
To continue the line into the garage just make sure you secure it at the very base, so the garage door still closes.  Check to see if your garage door closes ok - if it smashes the tubing you will need to notch out the inside bottom corner piece of the baseboard and run the tubing under that so it's "protected" from the garage door.  One of my garage doors closed without smashing the tube, the other garage door smashed it so I notched out that side using a small hand saw and drill.

Once inside the garage I ran it up, then over, back down the other side, and out the base to the next pot.  Just make sure to secure it and keep it out of the way of the garage door hardware!  I used a two-pronged nail (looks like a heavy duty staple, the kind electricians use to run wiring along studs before drywalling ) and hammered the tubing in place.  
Finally the last pot had water and I was done!  At least until I started hooking up my window box to have sprayers now too :)


Now I just got to go get my plants!