Pages

Tuesday, December 24, 2013

My Christmas Gift

I already shared on my blog that I picked out my Christmas Gift from
Restoration Hardware (regularly $850 Final Sale $500)


Here's how it looks in the Master Bedroom!


The light before - although very pretty and a lot cheaper (less than $100 from Overstock.com)- 
was just not big enough.


This one makes a much better statement in the room! 


 For Christmas and birthdays, I always want something for my house 
- before clothes, make-up, toys, trips, etc!
What about you?

*PS- YOU CAN STILL VOTE FOR MY HOLIDAY HOME HERE!
YOU HAVE UNTIL THE 30TH - HELP ME WIN!!!!!


Thursday, December 19, 2013

Help me Win a Contest!

I submitted these photos to a "holiday home" contest and was chosen to be a finalist.  Now it's up to you to vote for your favorite (hopefully it's mine!).  Click Here for the link to Vote.    
Mama wants a new couch!  :)  


Tuesday, December 17, 2013

Dining Room Addition

Most of my shopping lately has been for Christmas gifts - 
but I did find one great purchase for my home (I know- Big Surprise)!


I got this urn and large mossy ball at "Tai Pan Trading" last week.
My husband made me the "plant stand" (out of some scrap molding and wood) years ago 
and I am happy with it's new home in the Dining Room.


I think it adds a nice "formal" touch!


For more Christmas Photos of my home - check out my previous Christmas Posts Here!


Monday, November 25, 2013

A Shameless Plug

**WARNING!  This Post has nothing to do with decorating!
I don't really share details about my personal life on this blog because I figure you're really only here for the decorating - but if you are curious ….  Here's your chance to learn WAY more than you ever wanted to know about me!  :)  
Just Kidding (kind of).


My sister Kate Lee has put together a hilarious book of stories from our childhood and what it was like growing up in our family of 12!  You can purchase it now at Amazon for just $3.99 for your Kindle (or you can read it on an iPad or other device with a free kindle app).  Here is the link- enjoy!


Thursday, November 21, 2013

Laundry Room Lighting

The Laundry Room was missing one Last detail!

I found this old brass chandelier for $3 at the DI (a thrift store in Utah).
The spray paint is Rust-oleum's   "lagoon" in Satin finish (which you can find at Walmart).


I may keep looking for a different chandelier - one that's a little larger, since I think the space can handle it 
but I think I'll paint it the same blue, cause' I'm lovin that! 


Here's what the chandelier looked like originally, along with some other treasures I found thrifting that day.


The Lantern (missing a light) - was just $2 and I couldn't pass it up!  We'll see if I can remedy it somehow and hang it in the mudroom.  The lovely purple desk was $12 and will go in the guest room once the purple is gone!  To see more details on the Laundry Room click here.


Tuesday, November 12, 2013

Adding Casters to Furniture


I inherited this antique chair from my mom.  I recovered it in white fabric years ago and put it in my bedroom (see below).  When I moved it to the Laundry room I decided to give it a small update and simply replaced the fabric on the back (fabric found here).  To cover the staples I added  a roll of nailhead trim.  Love it!  The only problem was... it sat too low.  I really liked the chair and wanted to keep it but didn't know how to solve the problem.  One day I had a light bulb moment - I could add casters to give it height!!!  


It worked like a charm and as a bonus it is now very easy to roll from my desk to my sewing machine.  I found the antique metal ball casters here.  I decided to go with the tallest ones I could find.
They were pretty easy to install, first you drill a hole in the bottom of the legs 
(the size of the hole depends on the size of the caster).

Then hammer in this piece (it comes included with the caster). 

Finally you insert the wheel, this may also take some pounding from a mallet-  and Voila!


It's wasn't cheap ($30 with shipping for 4 casters) but worth it to me since this is a family heirloom and I got it free.  
So- a solution for furniture that sits too low and you can't replace the legs.  
Plus it adds a fun decorative detail which I am a sucker for!


Wednesday, November 6, 2013

Laundry Room Reveal!


Here is what it looked like when we moved in 
(and it pretty much stayed this way for 3 years!)

I've always wanted to decorate a girls room and use a little pink, 
since this is the only "girls room" in the house I seized the opportunity!
I love it!


****UPDATE I recently added corbels to the shelves (as pictured above),
 click HERE to see more :)


Love my built-in hamper!


Here are the sources:
For more on the painted "chevron" wall treatment click here
The grey paint color is "storm" by Benjamin Moore
The Pink fabric on the back of the chair and the back of the shelf can be found here
The Turquoise fabric on the bulletin board can be found here
I found the bulletin board at a thrift store and using spray adhesive attached the fabric then trimmed out the edges with a roll of nailhead trim.  I followed this tutorial.
For more info on the desk chair, click here
The pink rug, laundry baskets, small silver clock, and numbered hook wall plaque  I found at TJ Maxx
The pink/orange vases on the desk were clearance items at Target
The grey angel wing candle holder, 3 tree topiaries, and small green wreath are from Taipan
The small grey urn above the washer is from Kneaders
For more about the large safety pins on the wall click here
The cabinet hardware is from Hobby Lobby
The frames above the washer and dryer were ones I had in storage
The frame on the desk is from Home Goods
The brass "service bell" is from World Market
The desk lamp tutorial can be found here
The brown sewing machine cabinet was made by my Father and I am the lucky one to get it!
And Finally-
The fabulous pink and turquoise books on the shelves were FREE!!!!!!  From Re-Store - Did you know they give away their books for FREE!!!!!  I was so excited to find that out!  Not a great selection but hey you can't beat the price.  I did pay a few bucks for some additional books at a thrift store.


Monday, November 4, 2013

DIY "Blueprint" Artwork

What can I say -I am on an artwork kick! 
I recently hung this picture in our hallway downstairs. 
Here's the story: 
I wanted an image with a black back ground- (like a blueprint), 
but had a tough time finding one, so I figured out how to make one from a regular image!

Below is the original image I found on Wikimedia Commons 
(click here for the full resolution image).

And here's how it looks with a "blueprint" effect going on!
So Cool!!!
I only have instructions for how to do this using a Mac 
(I'm sure the same thing is possible on other computers or using other picture editing software though).
So first I imported the image into iPhoto and then using their basic editing software I made the image black and white and saved the new image to a folder.  Next you want to invert the colors (make the white parts black and the black parts white).  Go into your folder (not iPhoto) and click on the image (the image should open using the "Preview app").  On the top left of your screen select "Tools", then "Adjust Color."  This will open an "Adjust Color" box -

Right under the box with the blue green, and red graphs (or hills), you see slide arrows.  Slide the left side arrow to the right, and the right side arrow to the left, this inverts the colors.
The great part is- You can do this to any image to give it a "Blueprint" look!

The rest is easy - 
Decide what size you want,
Print the image out at staples (they are the cheapest for black and white enlargements).
Then Mod Podge it to a canvas.
Finally paint the edges of the canvas black, 
(I also dabbed some of the black paint onto the paper image to blend the lines). 
 Then Hang it and Enjoy!

There is something about an "inverted" image that I love.
Hope this opens up some artwork possibilities for you too!


Saturday, November 2, 2013

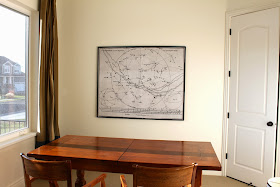
Large Scale Artwork

I pinned this picture a long time ago on Pinterest because I loved the artwork and hoped to figure out a way to DIY it.  


Well, I did it!

In this post I told you about discovering Wikimedia Commons for tons of free artwork.  
You can't imagine my excitement when I found this artwork!!!  I knew the rest would be easy!

I wanted this picture for the office (lots of decorating still to do in there!).  So based on that, I determined roughly the size I wanted.  The copy lady at Staples helped me know (based on the scale of the original image) what exact size it would end up being.  Mine ended up being 55"x45".  The printer at Staples can only handle blowing up pictures to 3 ft. tall so I asked the copy lady to please print the top half of the picture and then the bottom half separately with a little overlap so I could match the two halves together.  Sorry but I have no idea how she did that on her end - she just figured out how and got it done for me.  I love this lady - she figured out how to make my music artwork too!


Next I mod-podged it onto a 3/4" piece of plywood from Lowes that I had them cut to my pictures dimensions (cost for the wood was $22).  This was a great idea I got from here.  While at Lowe's I also picked up 3 pieces of 8ft. corner mold ($5 each).  This was to frame out the ugly edges of the plywood.  The cost of plywood ends up being slightly cheaper than buying a canvas and you can make the plywood any size you need which is a plus.  It is heavier though, so heavy duty picture hanging hardware was also required.  I picked some up at Hobby Lobby with a 40% off coupon so it was $6.


Once the picture was dry, I spray painted the corner molding black then glued 
and nailed it (using a nail gun) to the edges of the plywood.
Voila!

This print has a "grayish" imperfect background which I liked, but I still may stain it a bit 
to make it look "old" like my "pinned" inspiration picture.


So total cost was $43 plus around $6 for the 2 large prints from Staples - Just under $50.  
Not a big price difference from my Music Note artwork (it was $63) but this is slightly bigger.  
And I thought I should try (and blog about) another option for making large scale artwork.