Pages

Thursday, March 28, 2013

Paint Dipped Baskets

You may have seen this.........

               Source: pinterest


But, have you seen this?

 BEFORE:

AFTER:


Paint Dipped Baskets!

I saw some paint dipped baskets at TJ Maxx recently and decided to give the same treatment to this basket.  I already had white paint on hand so it didn't cost a thing and only took 5 minutes to make.  I used painters tape to mark a line all around the bottom fourth of the basket, then slapped the paint on with a sponge brush.  *You could fill up a large bucket with paint and "actually" dip the basket in it but I think this way is easier.  

It would be cute on all kinds of baskets and in all sorts of colors!


Sunday, March 24, 2013

My Pinterest Experiments

I (like many of you) love pinterest!  I have gotten great recipes, decorating ideas, party inspiration, etc., etc., etc.!  You have seen the decorating projects around my home that Pinterest has inspired -and now I have decided to let you know how I feel about some other Pin's I have tried. 
This past week I tried these three - here's what I think..... 

This sauce looked so good on Pinterest I was drooling.  I had my doubts that I would love it since I am not that big of a cauliflower fan - but this honestly blew my mind!  I had it on noodles and served it to my kids too.  My oldest son asked for seconds (a miracle!).   My other two kids were just ok with it.  I loved it and am excited to try some of her other recipes using this sauce.   So Thumbs Up to this one!

 Since it is Easter I tried this one last night with my kids.  Looks so cool and fun!   Sadly I have to give this one a big thumbs DOWN!  The shaving cream looked cool just like in this picture, but it didn't transfer well onto the eggs.  I let the eggs sit quite a while (probably 30 min.) in the shaving cream in hopes that the color would transfer well.  The eggs ended up looking very light and pastel - hardly any color at all -and definitely no cool swirly affects going on.  My kids loved playing in the shaving cream which was great but when it got on their clothes it stained them pretty bad - I'm working on getting that out now!  Next time I'll stick with the Dollar Tree egg dye kit!


Finally I have to give this last pin a thumbs up and a thumbs down.  A thumbs up because the cookies are amazingly delicious and a thumbs down because I have eaten way more cookies this week than I have in a VERY long time.   Wow - just looking at this picture makes me want to go grab another cookie out of the fridge right now!  My only suggestion is to make sure you cook them on a dark colored cookie sheet - I did mine on a light one and had to keep cooking and cooking them to get them to brown up slightly on the bottom - very frustrating!  Once I tried the dark cookie sheet the recommended cooking time worked perfectly!  (Pinterest link found here).

From time to time I will be back with more Pinterest Experiment posts to let you know what other Pins I am giving the Thumbs up or Thumbs down to.
Now go join Pinterest if you haven't already!  Seriously why haven't you?!?!


Thursday, March 21, 2013

DIY Wood Slat Artwork

I just finished this artwork project for my boys room and I was pretty impressed by how easy and cheap it was to make!


I was inspired by this boys room (found here) and the arrow on the wall.  I didn't know where I could find this artwork piece so of course my only option was to make something similar!


I also like all the "pallet wood" artwork that is so popular right now so I decided to go that route.  I headed to Home Depot and bought some wood fence slats for $1.50 each.  The slats were about 6 feet long.  I had a guy at Home Depot cut 12 inches off making the slats 5 feet long and square on both ends.  I bought a total of 6 wood slats, 5 for front and one slat cut in 3 pieces which I later screwed in on the back to hold the front pieces all together.  The 5 front slats run horizontally, as you can see, and the 3 pieces on back run vertically (one on each end and one in the middle).  

I already had the grey and white paint on hand so I only had to spend $1 to get a small bottle of orange paint from the craft store.


After painting the whole thing with one "imperfect" coat of white paint, I drew in my arrow using a yard stick and the inspiration picture for a reference.  Once the arrow looked good I taped it off and filled in the arrow with Grey paint.  Once the grey paint was dry I used a 1" foam brush and carefully followed the edge of my tape line to give my arrow the orange border.  Each time I painted I made sure not to cover the wood completely and let some areas show through - that way I didn't have to do any sanding in the end!  

Total time was about an hour and total cost was just $10.


I used D-ring brackets and some picture hanging wire to hang it on the wall.  


A store bought piece of artwork this size would be a lot more than $10, heck- a blank canvas this size would be a lot more than $10! 
 I enjoyed making this artwork because it was cheap, easy, and most importantly I had control over the color and the size.  I love how it turned out!  

For more information on this room click here.


Monday, March 18, 2013

Right Size, Right Price, Right Style, Wrong Color....

You can't change the Size


The Price


or The Style


But you CAN always change the color.  

So if contemplating a purchase that is the Right size, the Right price, and the Right style but the Wrong color - DO IT!  It can be a little scary but 9 times out of 10 -I am glad I took the risk of changing the color!  When decorating your home you've got to be willing to get your hands a little dirty!  
This is just a recap of the projects I have done in the past month.  
For more details on each of these color transformations click here, here, and here.


Tuesday, March 12, 2013

Mirror, Mirror, on the Sharpie Marker Wall

Here are the details for the mirror in my Powder Bathroom.


I knew I wanted a tall mirror and because the space between the two sconces is small - I figured I would pretty much be looking for a small wardrobe or leaner mirror.  Those can be pretty expensive so I decided to use a cheap version and just dress it up!

I found this great mirror from Walmart for just $45.   The dimensions (27" x 62") were perfect.
Next I looked into what I could do to dress it up (by the way this mirror is beautiful "as is" - the black frame was just a little too heavy for the room).  
I found this tutorial on Design Sponge for Silver Leafing a frame and decided to give it a shot.


Step 1:  I used my leftover grey chalk paint and painted the frame 


I only did one coat of paint- 
it wasn't completely covering all the black but I knew that it would be good enough!


Step 2: Once the paint was dry I covered the entire frame with silver leaf.  I bought a package (I think it was regularly priced at $9) that came with 25 sheets from Hobby Lobby and ended up using the whole thing and had to buy one more package to finish the job (I only used about 10 sheets of the second package).  I also used the Spray adhesive rather than the brush on adhesive - it was very quick and easy to work with.  Any areas of the mirror that got over-sprayed with adhesive I cleaned with rubbing alcohol and it came right off.  I didn't use any special tools - just my hands.  I didn't have to be too carful since I knew I would be sanding over the whole thing anyway.  I did find out the hard way that you want to make sure your silver leaf sheets overlap a little so that you don't have gaps every few inches between your sheets.  Overall it was a lot easier than I expected and went very quickly.


Step 3:  Sand over the entire surface, with a little *extra sanding in some spots to get all the way down to the grey paint and even to the black below that.  I am still amazed by the change from the above picture to the one below.  Pretty cool!


Step 4:  Using a damp paper towel dipped in stain or glaze, wipe over the entire frame to "age" the silver a bit (this also seals the silver leafing).


Done!


I must say I wasn't all that pleased with the mirror when it was finished and felt like it "matched" the room too much!  But the pop of green in the wreath unexpectedly hung at the top of the mirror fixed all that- and I was in love!


Monday, March 11, 2013

Easy Artwork

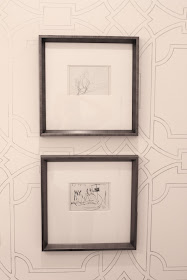
For the artwork in the Powder Bathroom I got a book at a used bookstore titled "The Art of Sketching"  It was only $4 but I got it for free since I traded in a couple books I no longer wanted.  The book included pencil sketches by Michelangelo, Da Vinci, Picasso, and others.  I framed two of them for this room in some frames I got at Target for $17 each.  


For more details on the Powder Bath click here.


I framed a couple more sketches for the Mater Bathroom as well.  
For more on the Master Bathroom click here.


These frames I already had on hand so this was a completely free addition!


Want some free sketches for beautiful artwork?  
I found this website that has some great sketches by Leonardo da Vinci that you could have printed in any size and then framed.


Friday, March 8, 2013

What's behind Door #2

The Powder Bath Transformation!!!


So I told you all I had plans to stencil our powder bath with this stencil.  What I didn't tell you is that I have actually had the stencil for months and haven't been able to bring myself to get out the paint and start this project.  I'm a little tired right now of projects (yes I am human).


Then I saw this idea from Vintage Revivals and it got my wheels spinning.

What if I just traced the stencil using a paint marker?  It sounded a little easier than painting it and it got me excited enough to attempt the project so it was already a win.

Here is the BEFORE: (Lots of room for improvement!)


And the After:

I used Sharpie Paint Pens (water-based) in the color "silver."  They cost $4.00 each (you can get them on sale for cheaper) from Michaels or other craft stores.  I used a total of 4 pens to do the whole bathroom.


Overall this did not end up being easier or harder than stenciling with paint and probably took the same amount of time.  However there were some aspects that did end up being easier -
No mess of paint, cleaning up of brushes, or getting out a lot of supplies every time I worked on it.  No taping baseboards or the edges along the ceiling, and I didn't have to remove any outlet covers or anything else for that matter!  The corners were also much easier this way than working with paint (again still not easy just easier).  In the future if painting a stencil, for the corners I think I would use this method of just tracing it out in pencil in the corner, then take the stencil down and paint in the lines.


The tile on the floor is a fake marble tile from Daltile - "Carrera star." I had the 12x12 square tiles cut in half so that they became 6x12's and could be laid in a brick pattern.  


Tracing (as opposed to painting) the stencil definitely achieves a different look 
and I am very happy with that!


 It just took time - no skill - just time.  There are probably easier stencils out there to trace, I just happened to already have this stencil so that is the one I traced!  Mistakes are still evident but thankfully not too noticeable when you look at the big picture.  I did find that a wet wipe was once again my best tool for fixing mistakes and cleaning up lines as soon as the stencil was removed and the paint was still wet.  I took my time on this project and only spent 1 or 2 hours on it a day (somedays more, somedays less) and I completed it in one week.  I would guess around 14 hours total.  The really nice thing was that it was VERY easy to work on a little bit at a time.  It was pretty mindless work so I enjoyed listening to a book while I worked - it's my favorite way to "read" lately and I highly recommend it when you're working on projects!


Part of this rooms transformation was also having an electrician install these sconces that I scored at a garage sale (thanks Kori!).  So no more ugly bar light as seen in the "Before" photo.
Click here for more information on the mirror above and here for information on the artwork below.


Once I was finished and stood back to look at this small room with all its pattern and design going on (and knowing that I had traced the whole thing by hand) I had a bit of a moment where I suddenly thought "oh no - I'm like the guy on "A Beautiful Mind" - I'm even a math teacher like him (yes that is true)!  If you haven't seen the movie basically I am just admitting that this room proves how crazy I am.  Everyone that now uses my powder bath in the future will exclaim "you traced this all by HAND!" and then they'll think "Man she is crazy"!  And now that I have posted this on the internet I can hear all of you thinking the same thing!  It's ok, I already knew I was crazy, this room just proves it :)


And if you don't follow my blog and are curious about the numbered door (?) - check out this post.

Monday, March 4, 2013

Master Bedroom Updates

In my New Years Resolution Post I wrote the following-
"Update the Master Bedroom.  I am working on redoing the bedding and nightstands.  For Christmas I got this new Duvet from West Elm (on clearance for $60 instead of $120 yeah!).   Now I just need new pillows and a throw for a whole new look.
 I also got a couple of these foyer tables from World Market (regularly $200, but I was able to get them 25% off so $150 each).  I am using them for nightstands.  I love the shape and style, however the color doesn't work for my room -but I can change that!"


UPDATE: I finally got around to painting the nightstands and changing up the bedding.  

Here is the Before


And Here is the After


The reason I bought these foyer tables instead of regular nightstands was because they fill the space perfectly.  I didn't like how our old nightstands looked so small and didn't fit quite right- plus our old nightstands weren't really "chosen" to be nightstands for our master bedroom - they were just random pieces of furniture that were functioning as such!  Kinda funny that I love to decorate and yet this is the first time in my life I picked out and bought nightstands for my room!
By the way I was able to repurpose the old nightstands for other rooms which worked out great!


For the nightstands I used Annie Sloan's chalk paint (in French Linen).  I LOVE how they turned out.  This is my first experience with this paint and I must say I now understand all the hype.  It really is fantastic paint.  Of all the furniture pieces I have painted over the years this took the least amount of effort for the greatest result!  Yahoo!  I definitely recommend the stuff.  It isn't in too many stores so I just ordered mine from a store online and had it shipped to me.  I didn't use Annie Sloan's furniture wax -just some other wax I had on hand to finish them off once the paint had dried.


My walls are still looking very bare but the plans for the room are just to big to tackle this year - I think these recent small changes will help me be patient for the rest of the room to come together,
 next year maybe?


For the bedding I already mentioned I got the square tuck duvet cover from West Elm for a great deal.  I will warn you if you are thinking of this duvet it doesn't look like the picture on West Elm's website - it is a very wrinkly, messy looking duvet (unless of course you want to spend hours ironing it so that it does look like their picture! - no thanks!)

The grey blanket at the end of the bed was a final sale item from Restoration Hardware.  The color of the blanket is "Fog" and is a great match to the color of the nightstands.  Restoration Hardware carries a lot of bedding in the color "Fog" but this particular blanket (Triple Gauze Cotton Coverlet) is no longer available in that color.

The white twill euro square pillows were from Ballard Designs - after Thanksgiving the company sent me a $50 gift card (thankYOU!)  so all together they ended up being just $20 with free monogramming and free shipping!

And the bolster pillow I made using the remaining pillow from my dining room settee couch and a sham from Z Gallerie (they no longer carry the shams but still have curtains in this pattern).


It is all very neutral, but I like to think of it as calming and sophisticated 
and I'm kinda into that right now!