Pages

Friday, March 23, 2012

Playroom Door Transformation

So when we moved into our home I was less than satisfied with our playroom door.  It was lacking in detail and character so I was excited to have an easy fix with this new product "overlays."  
Have you heard of them?

Before                                                                                      After


So they are lightweight, decorative fretwork panels that come in several sizes and patterns.  I first saw them on Pinterest.  Recently I also saw a project done with them on Centsational Girl (click here to see that).   Anyway the look I chose is similar to what I just painted in our Master Bath toilet area (click here to see) but I wanted some depth to the door rather than just a painted on design.  The panels come white and after spray painting them with plastic primer I spray painted them grey then glued them on the door with a small tube of liquid nails. It was a VERY quick and easy Transformation.  I recommend you check out their site (myoverlays.com) they have lots of fun ideas and pictures to see.


Finally I added our monogram to the middle of the top panel - you can find every letter in the alphabet at Hobby Lobby (they are almost always on sale for half price too!)

You may notice there has also been some trim work added to the walls - I'll show you that when it's all ready and put together!

Thursday, March 15, 2012

Kitchen Soffit Transformation!

Before


AFTER

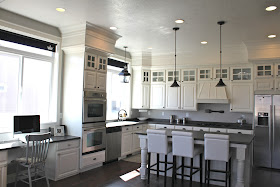
When we first moved into our home we had the builders add a drywall soffit above all the cabinetry with plans that we would one day add crown and other trim work to it.  While we had the dining room finish work done we had them complete the kitchen soffit as well.

More Before's


It is 3 pieces of trim - crown, a baseboard hung upside down, and pin mold at the bottom of the soffit.


We had them trim out the windows as well.


DONE!!!

By the Way - The new white leather barstools from Target are holding up great so I think I'll be stenciling them soon (well, kind of soon)!

Tuesday, March 13, 2012

Dining Room Transformation!

Sorry the posts have been few and far between as we have been in construction mode - but one room is complete!  We got the trim work all done in the dining room.  The stencil on the top portion looks a lot better now that everything is finished (to read more about the stencil click here).


Here are the BEFORE Pics:


The Before Ceiling  

DURING (in case you are into DIY trim work I thought I would show some pictures of the process)


AND the AFTERS (Sigh, AHHH!)


My husband has hung the trim in the rest of our house but we knew this project was beyond his skill set so this was done by professionals.  I have to say - I miss how cheap it was when my husband did it.  It is pretty expensive to hire out trim work - but they did A LOT of trim in this room and it took them quite a while to finish (and they worked very hard!).  So they were worth it!  With the completion of the room we went ahead and got our new dining table from Restoration Hardware and the Chandeliers are from Ballard Designs (they are the small size 23").  The rug is also from Ballard.  Now I am working on the Dining Chairs - of course I will post more when those are done!

Friday, March 2, 2012

Stop Thumb Sucking!

Do you have a thumb (or finger) sucker?


Do you want to Stop that Habit?

My brother Jon and his wife Kori (the ones with the beautiful homes that I posted about here and here) recently adopted a cute little boy from Haiti.  He came to them with a thumb sucking habit.  Once he'd adjusted to his new home, and life with them, they began working on his thumb sucking habit. They tried everything under the sun and nothing would work until they found the NoThumbT.  They loved the idea of an undershirt he could wear under his pi's every time he went to bed, he didn't mind the shirt either.  Since using the NoThumbT he hasn't sucked his thumb once!  They figure the T was much cheaper than major dental work and bills down the road. 
Here is their darling little boy - 
notice he is not bothered at all by the fact his hands are stuck!  :)

 This one is my little cutie modeling the NoThumbT

They believe so much in the product they want to share it with others, so check out their website NoThumbT.com!